 When you like to cook, you always get questions around the holidays about what you made. Well, I haven’t been cooking much lately, so I went all out this Thanksgiving and actually have some pretty good answers to that question. Here’s a quick overview of what I made, so instead of explaining all of this stuff over and over again, I can just say, “check my blog, loser.”
Of course, my mom and I were working together on a lot of this stuff, and she made the stuffing for the turkey and the table, as well as the green beans, gravy and a really cool apple-almond tart. She also used her magic touch on plenty of delicious whipped cream for all the desserts. Most of our Thanksgiving dinner was a team effort, and the turkey roulade was her idea.
 So let’s talk turkey for a second, because I think this is the most complicated thing I’ve cooked since I made porchetta for the first anniversary dinner of The Bachelor’s Test Kitchen. We started the night before Thanksgiving with a whole bone-in, skin-on turkey breast in the four to six pound range. I pulled the skin off in a single piece, which took forever. The recipe from the New York Times just said “separate the skin from the breast with your fingers,” but I used a paring knife to help because I was afraid of the skin ripping. I’m not sure which method is best, but I managed to get it all off in one large piece after about 15 minutes of work. It was meticulous and annoying, but it’s not like I had a ton of spare turkey breasts lying around to practice on.
After I took the skin off the bird, I carved the breast meat off the bone much the same way you would with a cooked turkey. My mom took all the leftover bones and meat to make roasted turkey stock, which we used for the stuffing, beet risotto and gravy.

One of the turkey breasts with salt and pepper.
The next day, we pulled the turkey meat and skin out of the fridge and rubbed the meat down with salt and pepper. I’m always very nervous about poultry turning out dry and tough, so I added a couple of steps to the turkey recipe. First, I placed each breast between sheets of saran wrap and pounded them with a heavy rolling pin for some extra tenderization. I also used a fork to jab a bunch of holes into inside of the turkey breasts, for tenderization and seasoning purposes. My mom had begun making the stuffing at that point, so I grabbed a handful of that and mixed it with additional herbs, spices, sweet Italian sausage and lemon juice.
The next step was assembly. I lay one breast smooth side down on a cutting board, then mounded the stuffing/sausage mixture on top of it. I lay the other breast on top with the smooth side up and the tapered end facing the opposite direction of the breast on the bottom to create the most even shape. It looked like a really gross version of a football. After that, it gets a little more complicated.

Turkey breast with stuffing
Per the directions in my recipe, I soaked a large piece of cheesecloth in butter and lay it in the roasting pan that would hold the turkey. Then, I lay the piece of turkey skin on top of the cloth with the exterior of the skin facing down. I then moved the turkey breast and stuffing creation on top of the skin and cheesecloth in the pan. I pulled the skin as tight as I could around the turkey breasts and was pleasantly surprised that it stuck there and held in place. Then, I pulled the cheesecloth tightly around the whole thing, bringing the ends together and rolling them down towards the meat in order to make the tightest package possible. By twisting and tightening the cheesecloth along the seam, then twisting the ends and bringing the excess cloth to the middle, you can flip the whole assembly over and the weight of the turkey will keep the cheesecloth from coming undone.


Our turkey breast was considerably smaller than the one in the recipe, so we cooked it in the Big Green Egg for about an hour and a half rather than two hours at 325. We were also sure to be very consistent with basting it with butter and turkey stock every 15-20 minutes so that it didn’t dry out.


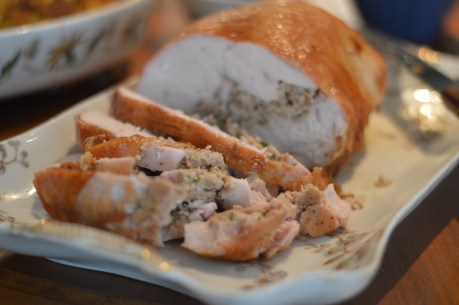
After it came out of of the egg, the turkey rested for a while and then I very, very carefully pulled off the cheesecloth. It really wanted to stick to the turkey and even pulled off a small chunk of meat, so it’s important to be very delicate with this step so that the turkey you serve looks as good as possible.

It’s resting
After all of that, the turkey was even better than advertised. The skin was crispy and browned while the breast meat was extremely juicy and tender; you could easily cut it with a fork. The stuffing was amazing, of course, and when we added gravy, I was convinced that it was the best Thanksgiving turkey I’d ever had. I’m usually pretty critical of my own cooking, but this was definitely one of my better achievements in the kitchen.


Later this week, I’ll share the recipe for the beet risotto that we made as a side dish. It’s actually something that I cooked as a main dish for dinner a couple of weeks before Thanksgiving, and it was so good that it made the cut for the Big Meal.

0 Comments